
To mend roof holes in New Jersey, start by removing damaged shingles and addressing weakened wood. Create a sturdy frame, then patch the hole and apply tar paper. Affix new shingles securely, always prioritizing safety.
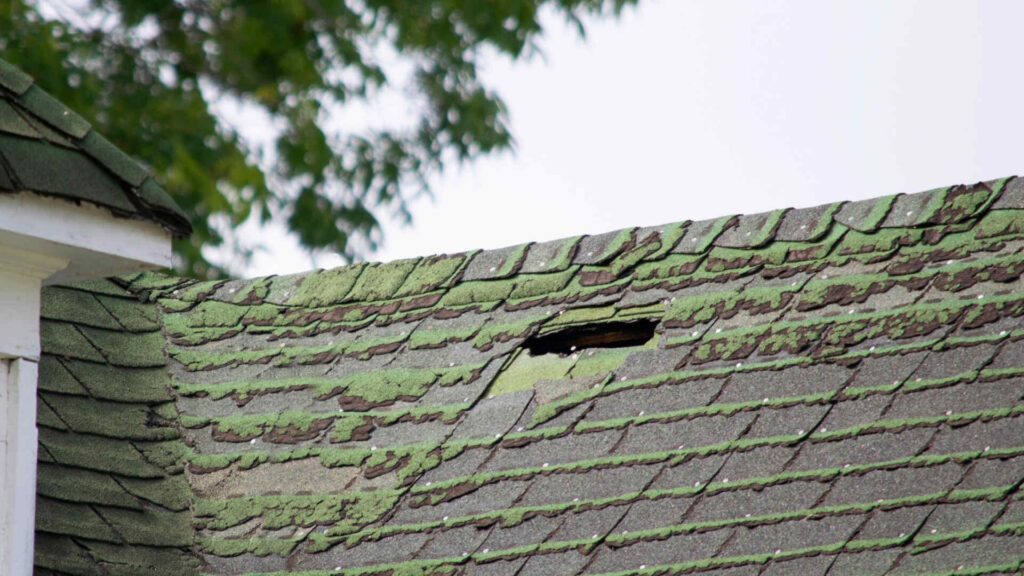
Table of contents
Safety First
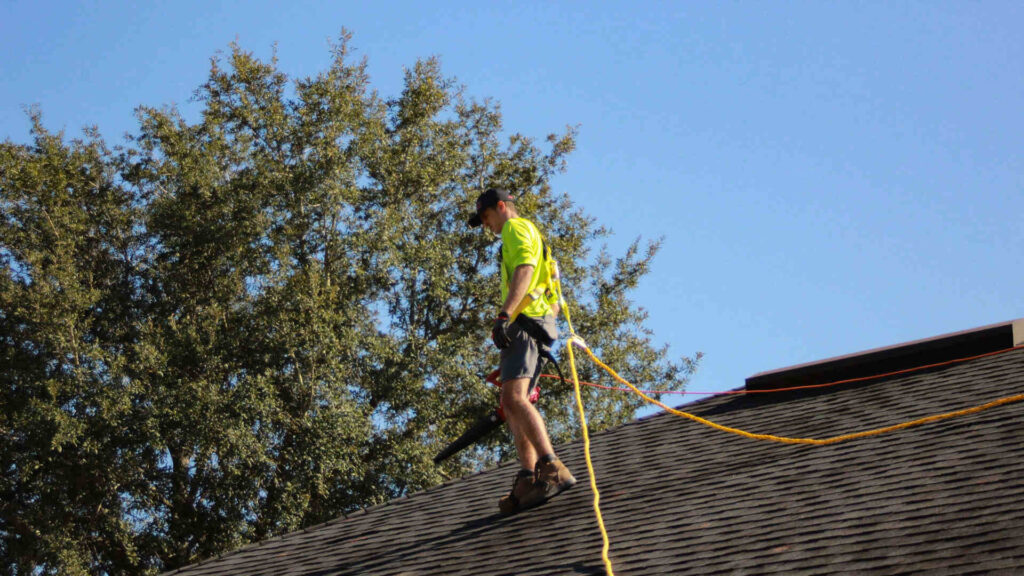
Before embarking on any roof repairs, prioritizing safety is paramount. Begin with a sturdy ladder, ensuring it’s placed on level ground and extends well beyond the roof’s edge. It’s essential to wear non-slip footwear like rubber-soled work boots and consider a safety harness if working on steep surfaces.
We recommend tying off and using a harness.
Wet and icy conditions make roofs treacherous, so it’s best to avoid repairs during such times. Working with a partner can offer additional safety, allowing for an extra set of hands and immediate help if needed.
And while protective eyewear and gloves are advised, knowing your own limits is crucial. If a task seems too daunting or risky, seeking professional assistance is always the best course of action. In roofing, as in many things, safety should always come first. We strongly advise against attempting roof repairs independently unless you possess professional training and expertise.
Inspecting the Damage
Before addressing roof repairs, a thorough inspection is important. Start by checking the attic for signs of water damage or light breaches, indicating potential holes. Externally, evaluate shingles for signs of wear, such as cracks or looseness.
Examine metal flashings around roof intrusions for integrity, and ensure gutters are clear and free from excessive shingle granules. Pay attention to any sagging areas or the presence of moss, as they can signal underlying issues.
Always prioritize safety during roof inspection, and when in doubt, consult a professional to assess the damage.
Consider using a Drone
Using a drone allows you to see damage without going on the roof. You can get a general idea of the materials you might need and identify the extent of the damage before even going on the roof. Some roofers even over drone services with A.I. to identify damage without ever going on the roof.
Cleaning the Surrounding Area
A clean roof not only ensures a smoother repair process but also allows for better adhesion of materials. Start by removing any debris, such as fallen leaves, twigs, or moss from the affected area.
If there’s accumulated dirt or algae, consider using a soft brush or broom to gently scrub it away. For more stubborn areas, a mixture of water and mild detergent can be used but remember to rinse thoroughly afterward.
Ensure the cleaned area is dry before beginning any repair work, as moisture can interfere with the adhesion of sealants or patches. A clean and dry roof surface is crucial for the longevity and effectiveness of your repair efforts.
How to Mend Roof Holes in a Shingle Roof?
Repairing roof holes in a shingle roof is essential, especially in regions like New Jersey, where weather conditions can challenge roof integrity. Understanding the steps involved in shingle roof repairs is crucial for addressing small punctures, damaged shingles, or more extensive issues.
Removing Damaged Shingles
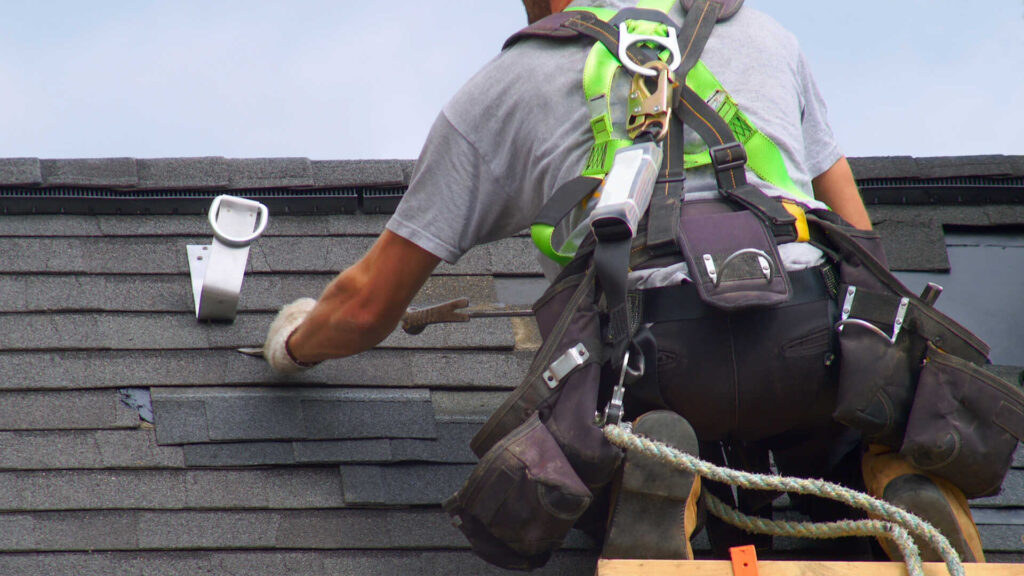
Begin by gently prying up the edges of the neighboring shingles with a pry bar or screwdriver, revealing the nails of the damaged shingle. Carefully extract these nails, allowing the compromised shingle to be slid downward and out.
Once removed, inspect the area underneath for any additional damage or deterioration in the felt paper or underlayment, addressing any issues before proceeding with a replacement.
Dealing with Damaged Wood
The wood decking beneath your shingles is vital for your roof’s structural integrity. When damaged by moisture, pests, or wear, it can compromise your roof’s stability. Identify weakened wood by its spongy feel or visible signs like mold and rot.
Before initiating repairs, ensure the area is safe to tread on, as deteriorated wood can be hazardous. To address the damage, carefully cut out compromised sections with a circular saw, reaching slightly into the adjacent healthy wood. Replace these with matching wood pieces, securing them in place flush with the surrounding area.
To safeguard against future harm, apply a protective sealant or wood preservative, especially if moisture or pests caused the initial damage. Proper ventilation can further prevent wood decay.
Creating a Frame
When repairing a substantial section of damaged roof wood, a robust frame is indispensable for stability. Begin by gauging the dimensions of the damage to determine the size of the frame and required materials.
Typically, lumber like 2x4s is used, though adjustments might be necessary depending on the roof’s depth. After cutting the lumber to fit, position it around and potentially across the damaged expanse, fastening it securely with screws or nails.
For larger damaged sections, consider the added strength of metal brackets or plates. This foundational frame ensures the final repair seamlessly merges with the roof’s overall structure.
Patching the Hole
Thoroughly cleanse the damaged area, ridding it of debris, moss, or moisture; tools like a wire brush or sandpaper can prove handy here, especially if there’s old sealant. Once cleaned, cut your chosen material slightly larger than the hole to guarantee a tight overlap.
Applying roofing cement around the hole creates a robust adhesive bond and an additional moisture barrier. Place the patch over the hole, pressing firmly. If the patch is made of roofing material or metal, consider adding nails or screws for added resilience.
Ensure the patch sits flush with the existing roof, as protrusions can be vulnerable to future damage. Sealing the patch’s edges with additional roofing cement further wards against moisture. For added longevity, consider a weatherproofing sealant.
Applying Tar Paper
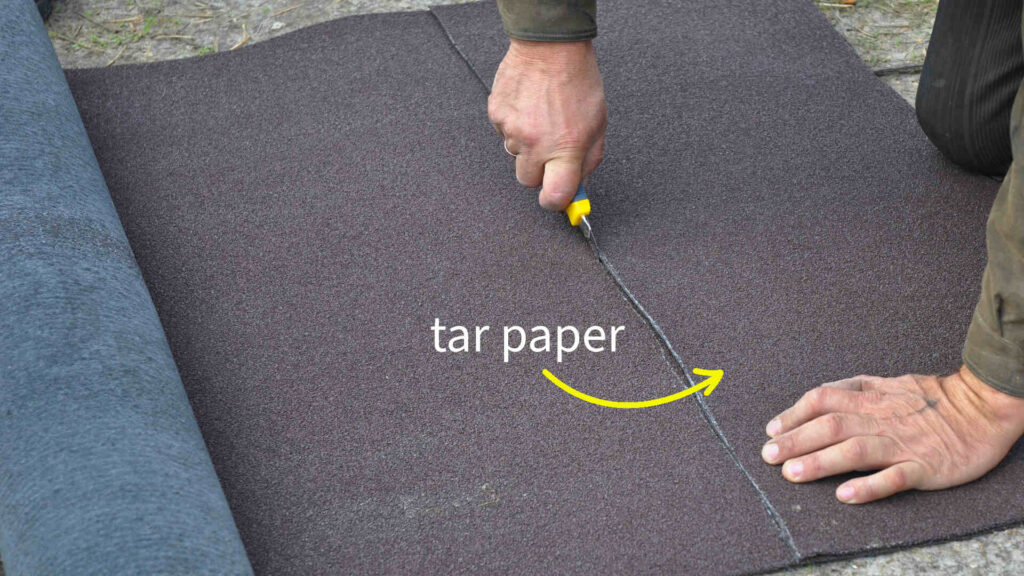
Tar paper, or roofing felt, provides a moisture barrier for roofs. For installation, start with a clean roof and select a paperweight, such as #30 for durability. Beginning at the roof’s bottom, unroll horizontally, keeping the paper tight and crease-free.
Overlap seams by 2 inches horizontally and 4 inches vertically. Secure with roofing nails or staples and trim excess. Layer each subsequent strip over the previous one and make precise cuts around vents or chimneys, sealing with roofing cement.
Affixing Shingles
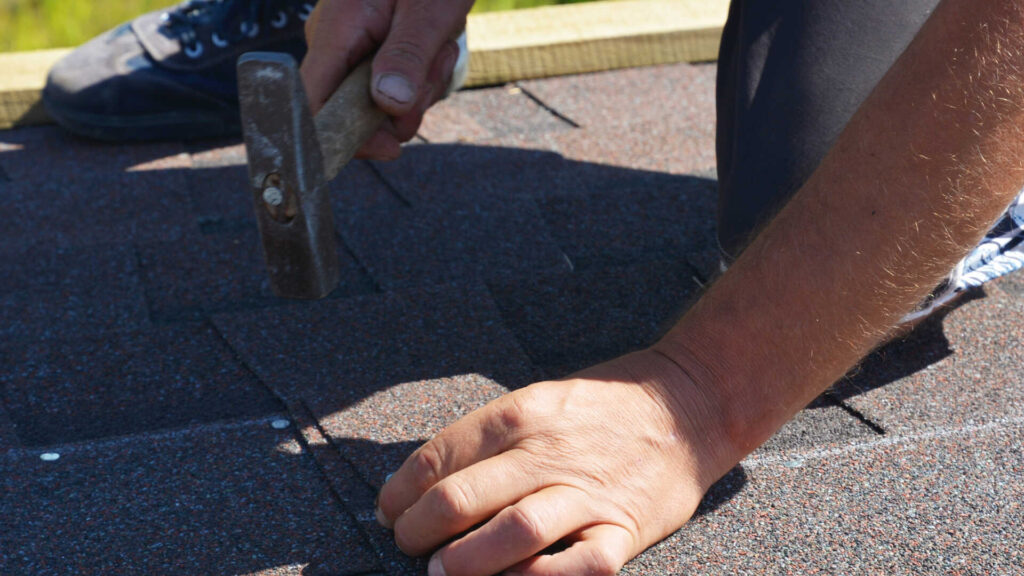
Properly affixing shingles is vital for roof integrity. Start with matching shingles and a secured underlayment. Begin at the roof’s bottom, ensuring the starter shingles slightly overhang to guide water into gutters.
Align using a chalk line for precision, and nail each shingle securely, adjusting the number of nails based on wind conditions. Stagger shingles as you progress to enhance water runoff and appearance.
Custom cuts might be necessary around obstacles like chimneys. For precision, use a roofing knife. The final row should be reinforced with roofing cement, especially at corners, to combat wind uplift. Finish with an inspection, applying roofing cement to any raised shingle edges for a snug fit.
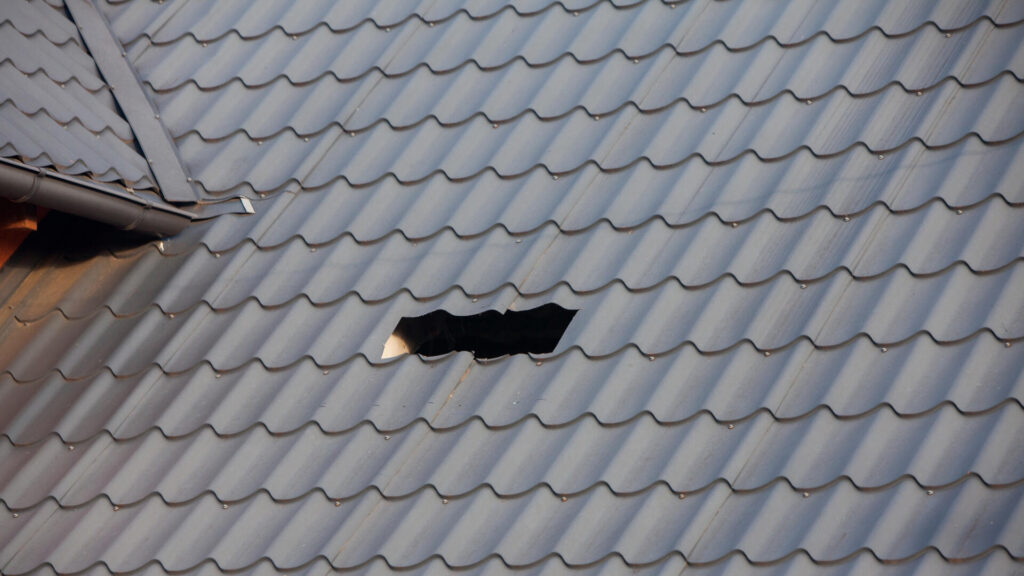
What if Your Roof is Made of Metal or Tile?
While the previous sections have focused primarily on shingle roofs, it’s essential to recognize that not all roofs are created equal. If your New Jersey home boasts a metal or tile roof, addressing roof holes will involve some unique considerations.
Metal Roof
Start by locating the exact spot of damage. Over time, metal roofs can corrode, leading to small holes or weakened areas. Clean the area with a wire brush to remove rust and any old sealant. Ensure it is dry before applying any repair material.
Roofing cement or a specialized metal roof sealant can be used to cover smaller holes. For larger gaps, cut a piece of matching metal, apply sealant around the hole, and screw the patch in place. Ensure all edges are sealed to prevent water intrusion.
Always use compatible sealants and patches for your specific metal roof material for the best results.
Tile Roof
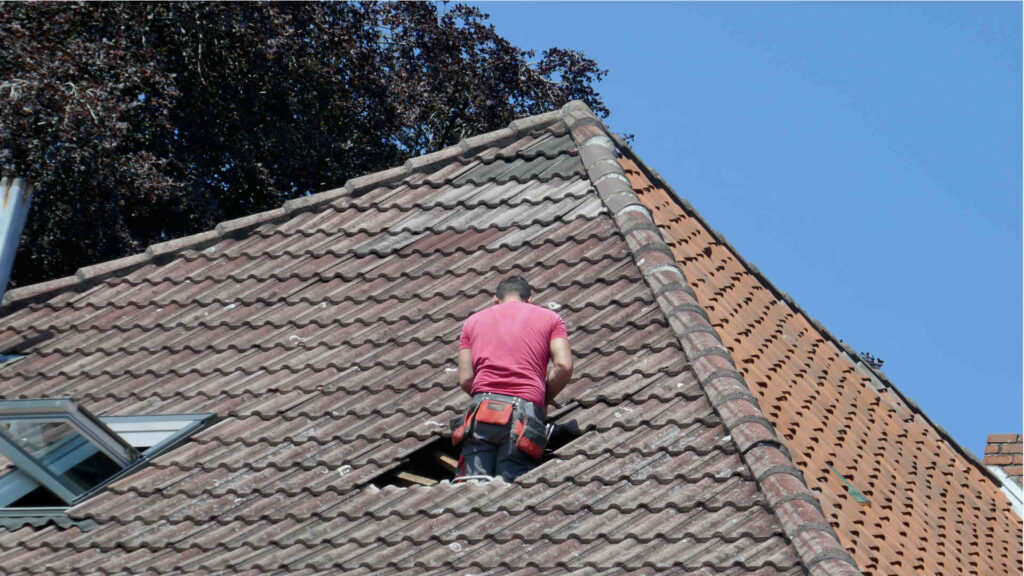
Tile roofs can crack or break due to weather extremes or physical impact. It’s important to replace damaged tiles promptly to prevent underlying damage.
Carefully remove the broken tile without damaging adjacent tiles. This usually involves lifting the tiles around it slightly to free it. Once the damaged tile is removed, replace it with a new one. Slide the new tile into place and ensure it sits flush with its neighbors.
Depending on the tile type, it may need to be secured with adhesive or mortar. It’s also beneficial to check the underlayment beneath the tile to ensure no water has seeped through.
Additional Tips for Roof Hole Repair
Roof repair, while seemingly straightforward, often has nuances that can be overlooked. Enhance the durability and effectiveness of your roof repairs with these additional tips:
- Check Product Warranties: Before starting any repairs, review the warranty of your roofing products. Some manufacturers may void warranties if the products are not installed by certified professionals.
- Roofing Material Compatibility: When purchasing materials for patchwork, ensure that they’re compatible with your existing roof. Mismatched materials might not only look out of place but could also lead to further issues down the road. For instance, pairing certain metals can accelerate corrosion due to galvanic reactions.
- Consider Professional Installation: While DIY repairs can save on upfront costs, there’s value in considering a professional’s touch, especially for extensive damages. Professionals bring in-depth knowledge, specialized tools, and experience to ensure the repair is durable and up to code.
- Regular Roof Inspection: Periodic inspections can help homeowners spot and address minor issues before they escalate into major concerns. If you’re considering a professional roof repair consultation, we provide roof tune-up and inspection services for only $99. Engaging in such expert services can offer an insightful perspective into your roof’s health and ensure it remains in prime condition for years to come.
- Check Local Regulations: Although New Jersey’s Department of Community Affairs has removed the requirement for permits concerning roof repairs or replacements in one- or two-family homes, it’s still essential to consult with your local municipality or homeowner’s association to ensure your repair procedures and materials align with local and community standards.
Conclusion
Safety should always be your first consideration, from proper gear to favorable weather conditions. Inspecting the damage diligently, cleaning the area thoroughly, and selecting the right materials are fundamental steps in achieving a successful roof repair.
In the Garden State, where weather variations are part of life, these skills become invaluable. Moreover, understanding the implications of product warranties and the importance of professional assistance when necessary adds another layer of wisdom to your homeowner’s toolkit.
By consistently applying these insights, you’re not just mending roof holes; you’re fortifying your home against New Jersey’s unpredictable climate, ensuring that your shelter remains steadfast and your family remains protected.
Fact checked by Jacob Petrosky – 9/26/23